From Canyon Walls to Hoodoos, Horizons, and High Desert Light
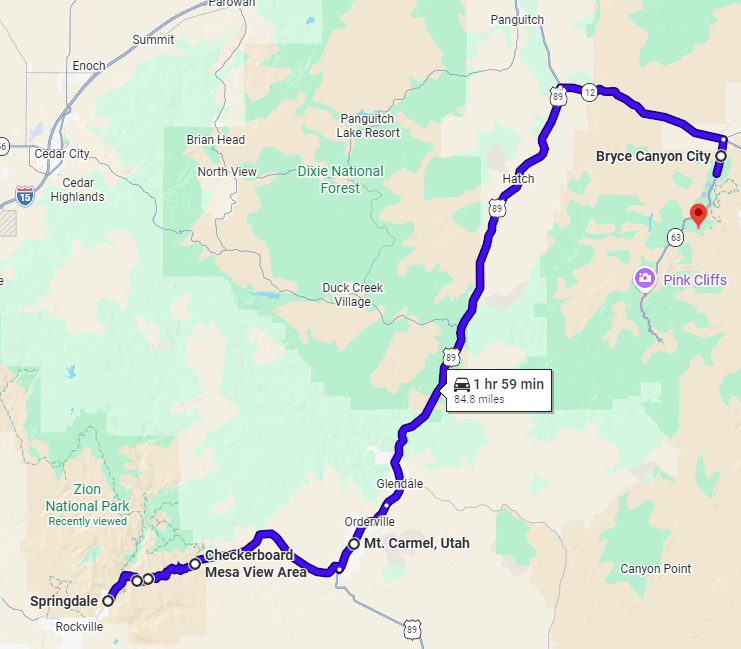
Driving From Zion Canyon to Bryce Canyon
We will begin our journey by leaving Springdale and heading east on UT‑9, leaving Zion National Park through its East Entrance corridor. Almost immediately, the landscape begins to shift, as the sheer canyon walls along the Virgin River give way to broader formations etched with softer lines and layered colors. The road climbs toward the Zion–Mount Carmel Tunnel before emerging onto the park’s quieter east side, where slickrock and open terrain begin to replace the enclosed canyon. Continuing to Mt. Carmel Junction, we transition onto US‑89, where the landscape opens further into rolling high desert and small rural communities. Turning onto UT‑12, the route begins to rise again, colors deepen, and red rock formations reappear—signaling our approach to Bryce Canyon.
How to navigate with your mobile device
JCVWalks are designed to be easy to follow on your mobile device. As you walk, you can tap the header or photo for each point of interest to open the location directly in Google Maps. This will help you navigate from your current location to the next point of interest. If you’d like to learn more about any stop along the way, just click the links in the description for additional details and context.
Zion-Mt. Carmel Tunnel
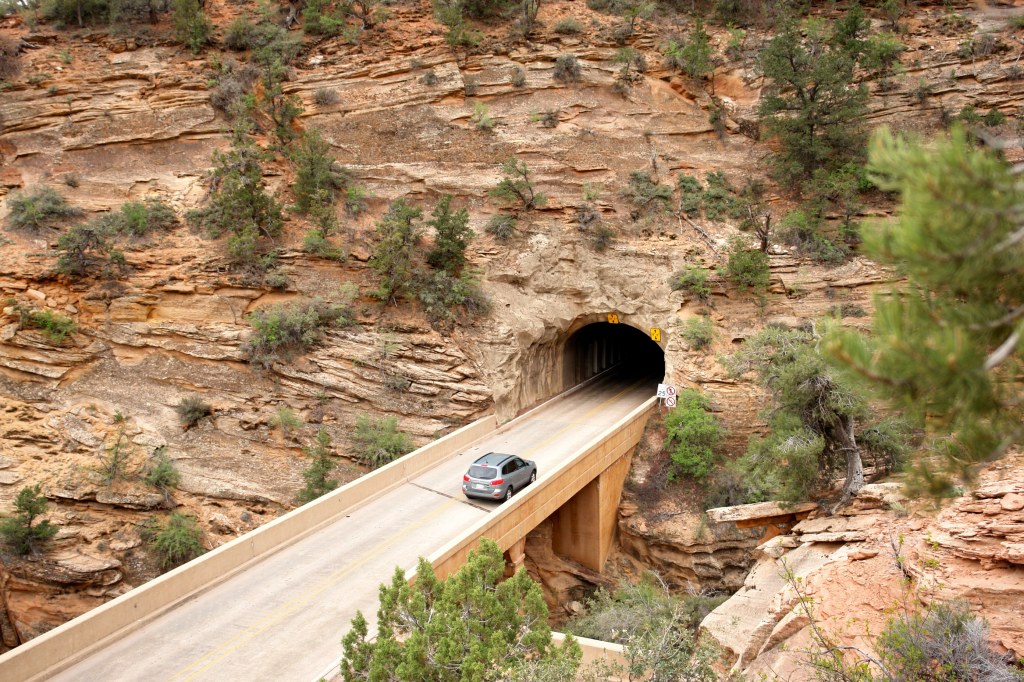
As we continue, the road climbs steadily toward the Zion–Mount Carmel Tunnel, an engineering landmark carved directly through the sandstone. Completed in 1930 to connect Zion with Utah’s east side, the tunnel stretches just over a mile and was a remarkable feat for its time, opening access to what had been a far more remote section of the park. As you drive through, notice the series of window-like openings cut into the rock, designed to bring in light and ventilation while offering brief glimpses of the canyon. The experience shifts from dark and cool to suddenly bright as you emerge onto the east side.
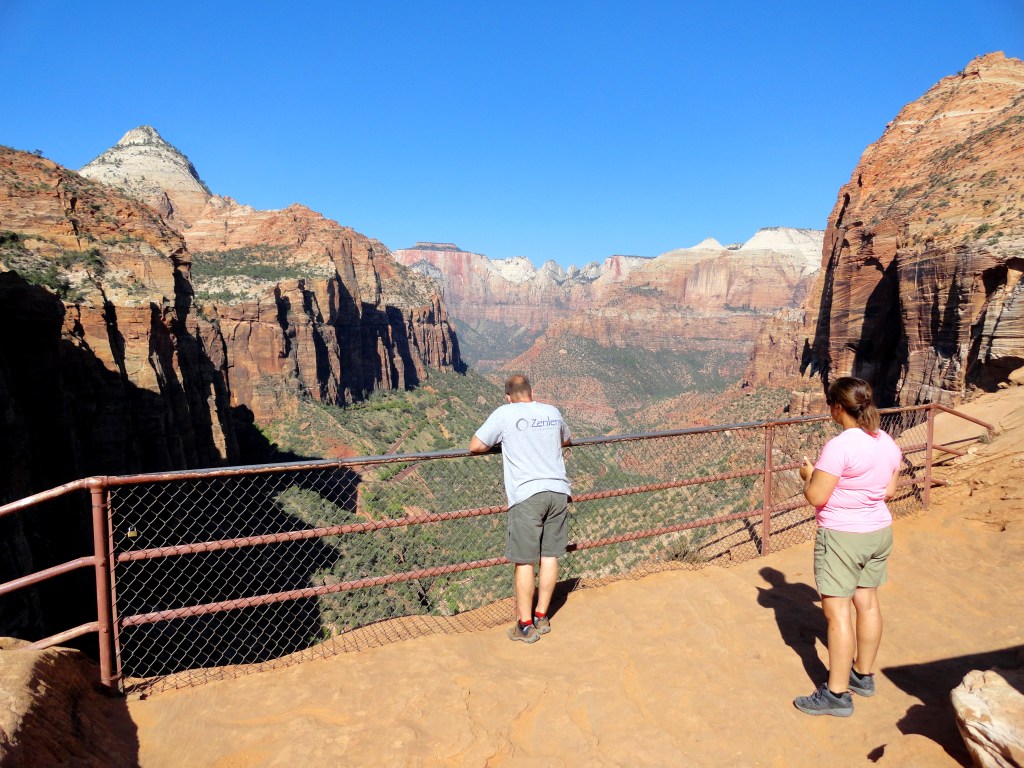
Zion Canyon Overlook Trail
As we exit the Zion–Mount Carmel Tunnel notice a small, busy parking area on the right-hand side of the road. If you can, pull in, park and cross the road to reach the trailhead. Otherwise, look for parking along the roadway. The start of the Canyon Overlook Trail is clearly marked, with stone steps leading upward into the rock. From here, the shift is immediate—you leave the road behind and step directly into the landscape, beginning a short but memorable climb toward one of the best vantage points in Zion. At the overlook, the full scene comes together. You will be looking out over Zion Canyon, with the Towers of the Virgin rising prominently in the distance and the road below tracing the path you just traveled. It’s a sweeping, elevated view that feels earned, despite the relatively short hike. Take your time here. The perspective is different from anything you see from the canyon floor, and the light tends to shift beautifully across the rock formations. When ready, we will return the way we came and continue our journey east.
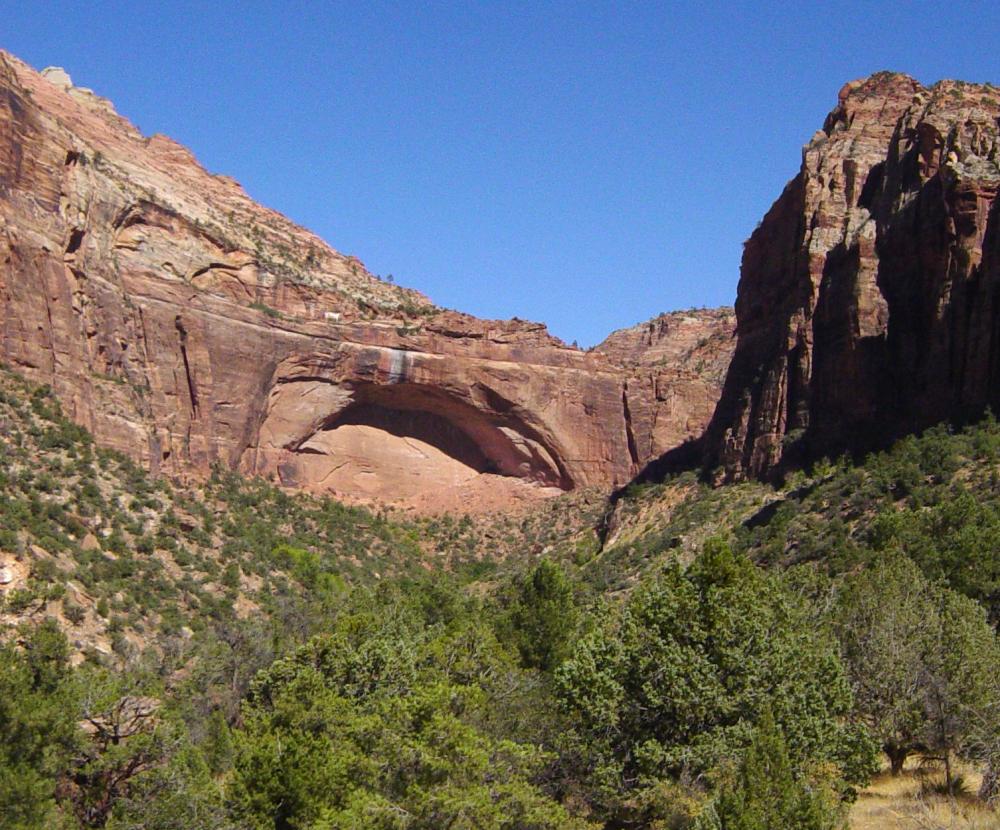
Great Arch Viewpoint
As we continue just beyond the tunnel, the landscape opens slightly, and you may catch sight of a dramatic natural arch high on the cliffside above the road. This is the Great Arch, and while there isn’t a formal stop directly beneath it, there are small pullouts nearby where you can pause briefly. It’s an easy one to miss if you’re not looking up. The scale is impressive, especially so soon after leaving the tunnel, and it sets the tone for this eastern section of Zion—less enclosed, but still full of character. As the road winds gently through the terrain, notice how it seems to flow across the rock rather than cut through it. The smooth sandstone—often referred to as slickrock—creates a landscape of soft curves and subtle elevation changes. This section is less about a single landmark and more about absorbing the texture of the land. The shapes here feel sculpted, almost fluid, especially in the morning light.
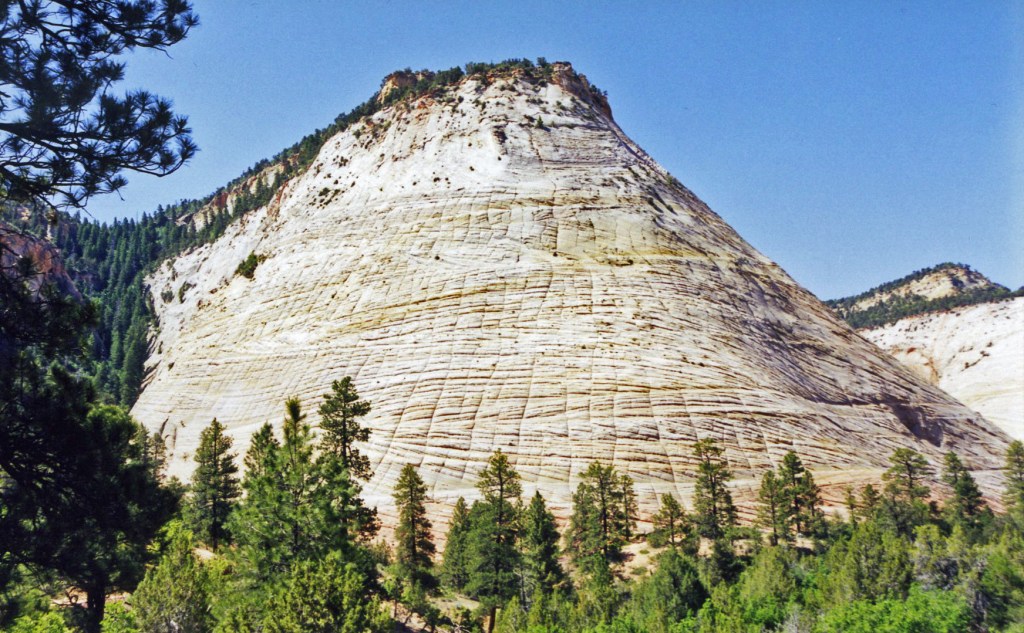
Checkerboard Mesa
We will soon arrive at one of the most recognizable formations in this part of the park: Checkerboard Mesa. From the roadside pullout, you can clearly see the grid-like pattern etched into the rock face. These cross-hatched lines were formed by a combination of wind, water, and freeze-thaw cycles, creating a natural pattern that feels almost designed This is an ideal quick stop. The view is immediate, the parking is usually manageable, and the formation photographs well from a relatively short distance.
As we continue east, the canyon gradually softens into wider terrain. The colors begin to shift—more pale sandstone, touches of cream and light orange—and the vegetation becomes slightly more prominent. This is where Zion transitions into something quieter and less dramatic, but no less interesting. The road stretches a bit more, and the sense of space increases. There are occasional roadside pullouts here that offer long views back toward the formations you’ve just passed through. If the light is right, this is a beautiful place for a final look before leaving the park.
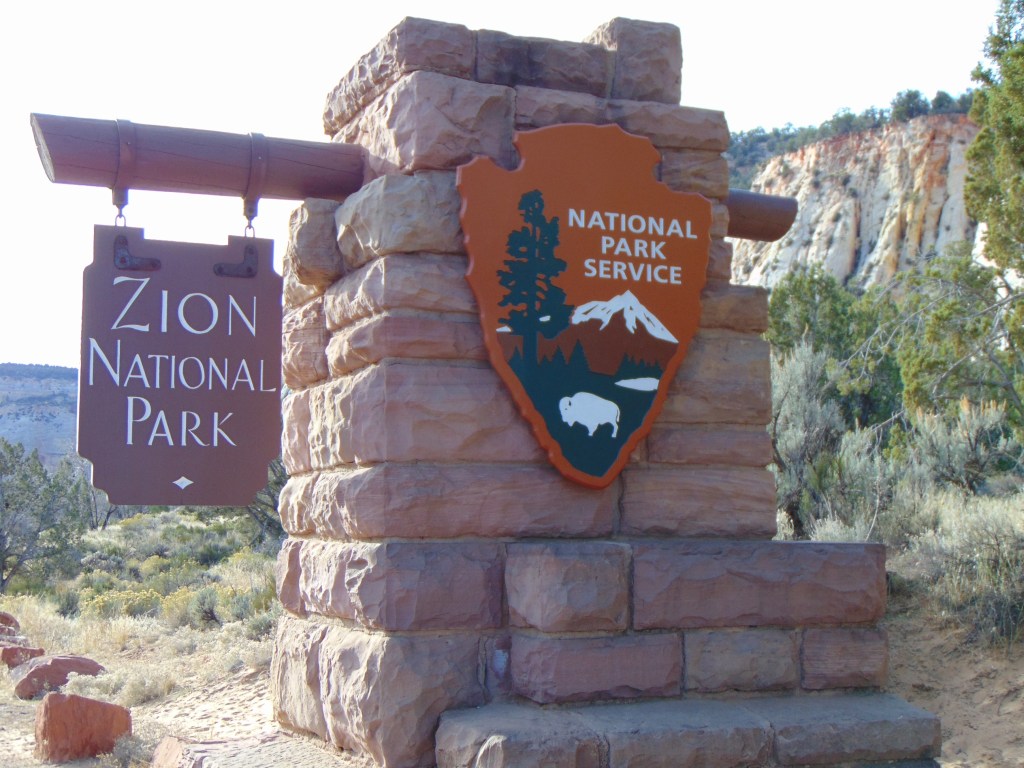
Zion National Park Boundary
Finally, as we near the east entrance of Zion, the landscape feels noticeably different from where we began in Springdale. The towering canyon walls are behind us, replaced by broader high desert terrain that begins to hint at what’s ahead toward Bryce. This transition is worth noticing. It’s not abrupt—it unfolds gradually, and it’s part of what makes this drive feel like a journey rather than a transfer.
Mt. Carmel Junction – A Natural Transition
As we arrive at Mt. Carmel Junction, the journey takes on a different rhythm. Here, UT‑9 meets US‑89, and the landscape opens into the wider desert, marking a clear transition from Zion’s canyon walls to the broader terrain beyond. At the junction, turn left onto US‑89 toward Bryce Canyon. A right turn would lead to Kanab, with access to Coral Pink Sand Dunes, the Grand Staircase, and the North Rim of the Grand Canyon, along with the nearby Belly of the Dragon. Today, we head north, where the road stretches out and the horizon begins to widen.
US‑89 North – Through Mt. Carmel, Orderville, and Glendale
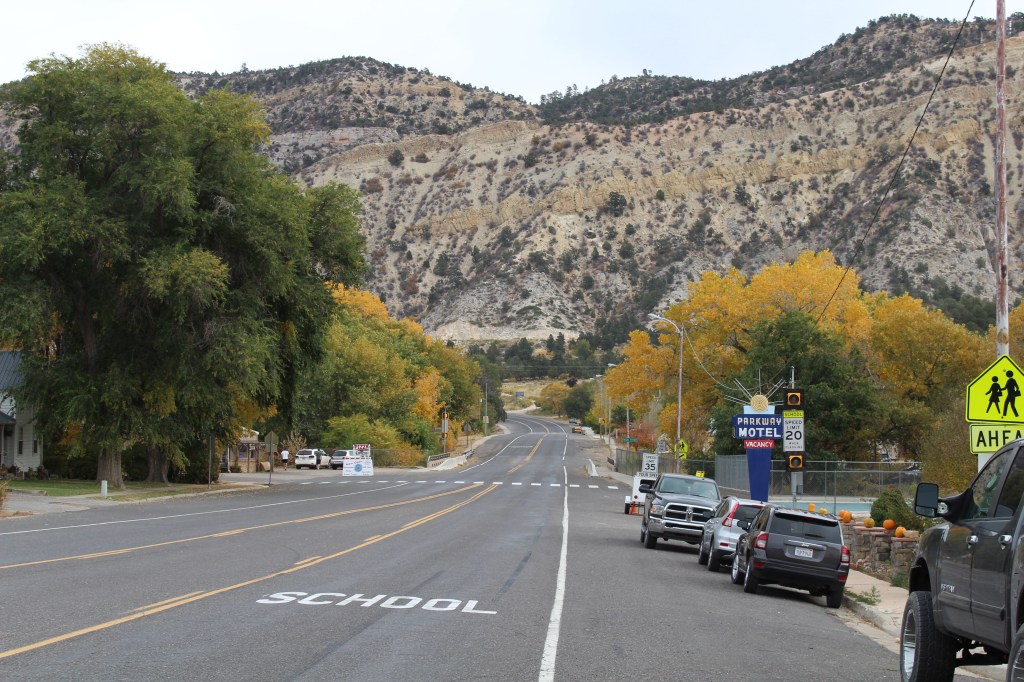
After turning left onto US‑89, we begin the northbound drive (approximately 45 miles) toward UT-12. We pass through Mt. Carmel almost immediately, a small community that marks the end of Zion’s immediate influence. The road straightens, and the landscape begins to open. Continuing on, you’ll move through Orderville, where the terrain transitions to wider valleys and low, layered hills. The sense of space increases, and the drive becomes more relaxed and steady. A short distance further brings you to Glendale. Just beyond Glendale, watch for the turn to the right onto UT‑12. It’s well marked, but easy to pass if you’re not paying attention. Bryce Canyon National Park is about 15 miles ahead on the right.
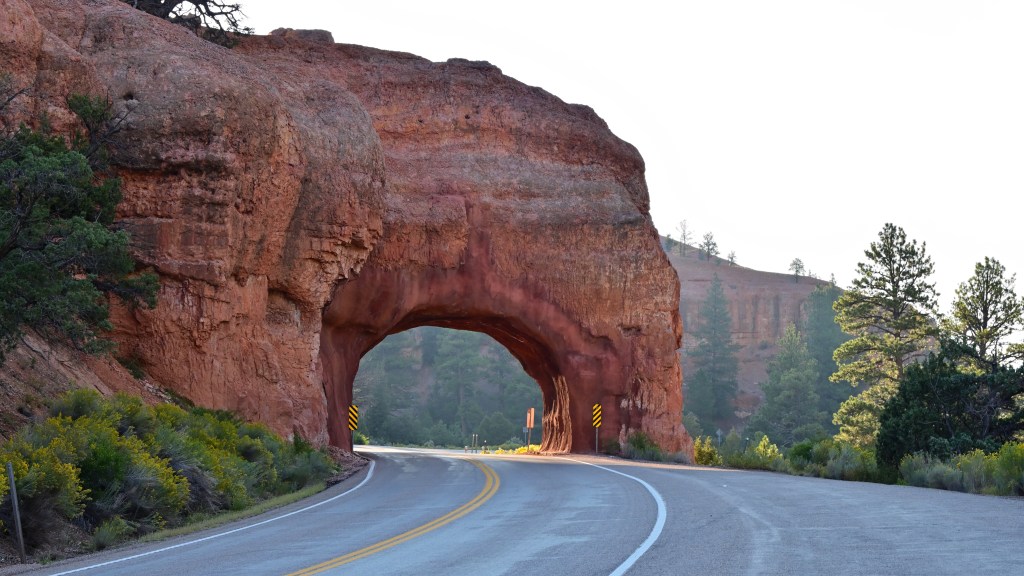
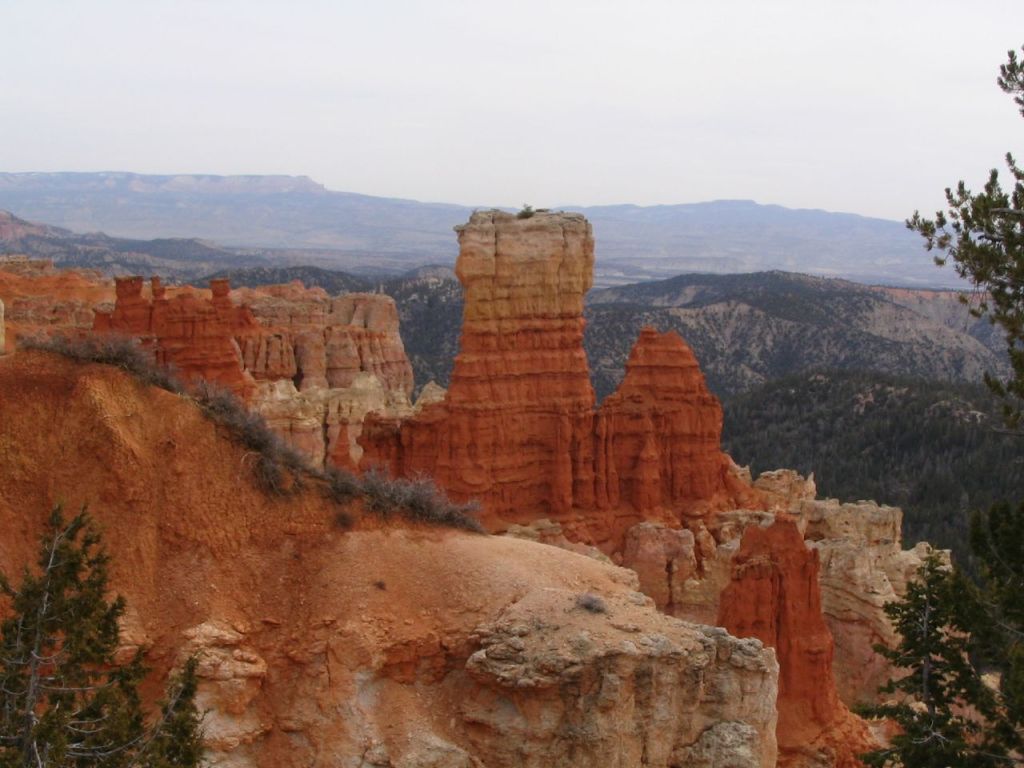
Red Canyon Arch
As we continue along UT‑12 toward Bryce Canyon, we’ll pass through the Red Canyon Arch, a striking red rock formation that spans the roadway itself. The arch sits directly over the highway between mile marker 10-11, so you’ll drive beneath it—an unmistakable landmark and a clear signal that you are nearing Bryce. There are small pullouts nearby if you wish to stop for a closer look or a photo, but even from the road, it’s a memorable moment. Consider it a natural gateway, marking the transition from the open landscape into the distinctive red rock environment that leads into Bryce Canyon.
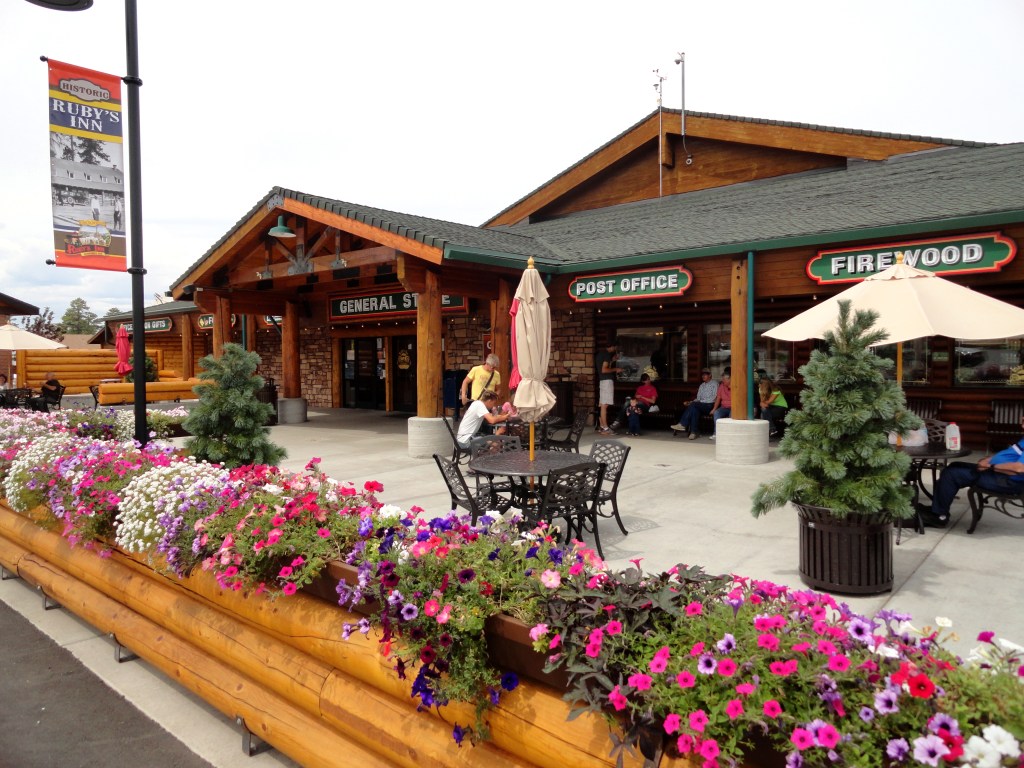
Bryce Canyon City
As we continue just a few miles ahead on UT‑12, watch for the right turn toward Bryce Canyon City. This town grew around what is now known as Ruby’s Inn, one of the early gateways to Bryce Canyon. Long before the park saw steady visitor traffic, Ruby’s served as a base for travelers making their way to this remote and lesser-known corner of Utah. Over time, it evolved into a central hub for lodging, supplies, and tours, helping to establish Bryce Canyon National Park as a destination rather than a curiosity. Today, the area is still anchored by Ruby’s, now expanded into a larger complex. If you’re not staying inside the park at Bryce Canyon Lodge, there’s a good chance this is where you’ll be based. It functions as both a staging point and a reentry point—where visitors gather what they need before heading into the park and return after a day among the hoodoos.
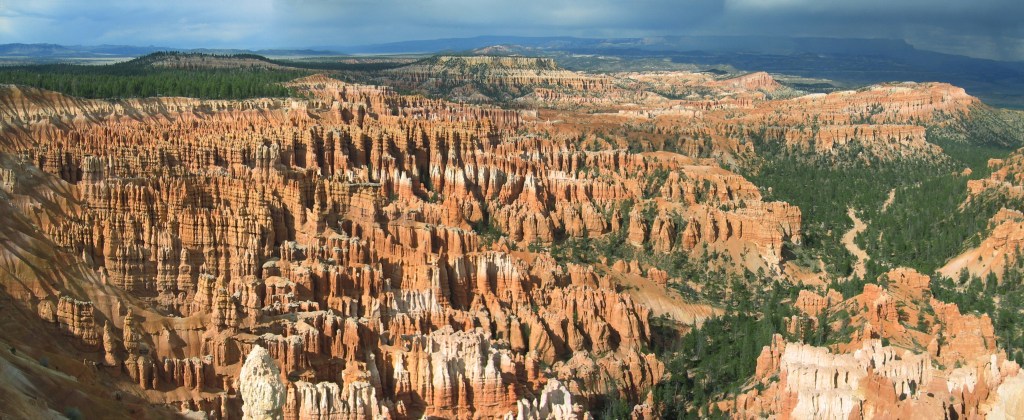
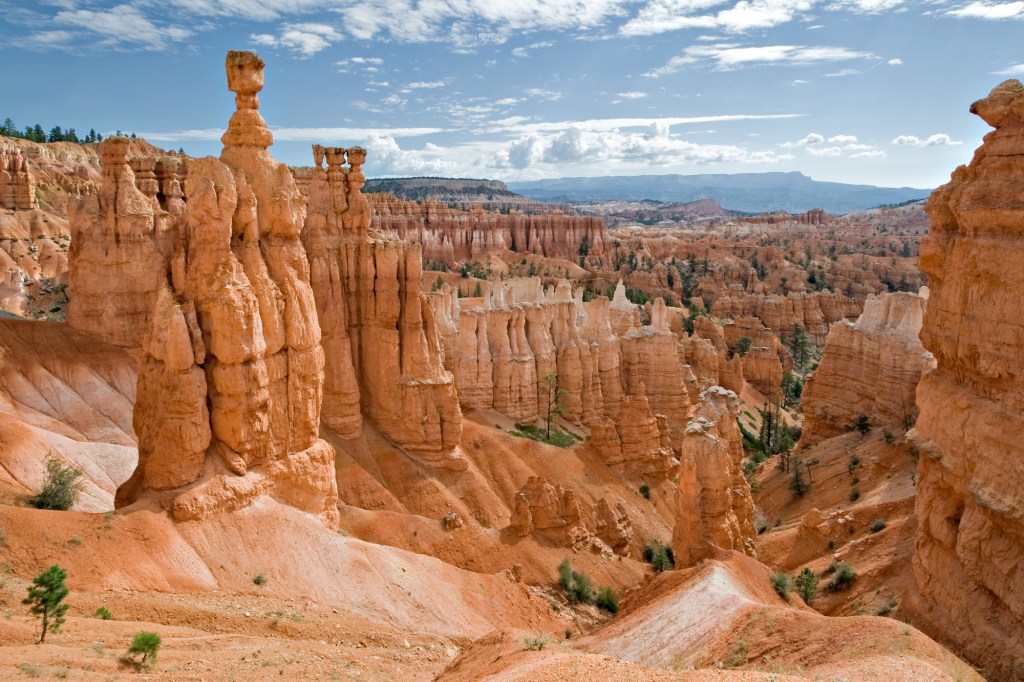
Bryce Canyon National Park
Bryce Canyon National Park feels different the moment you arrive—especially coming from Zion. You are no longer moving through a canyon but standing at the edge of one. The landscape opens into a vast natural amphitheater filled with thousands of sculpted rock spires known as hoodoos. We’ll spend the remainder of the day exploring from the rim and below it—combining easy walking paths with a short descent into the canyon. This approach allows you to experience both the scale of Bryce from above and the texture of it up close. The elevation is higher, the air cooler, and the light plays differently here. As the day unfolds, the colors shift across the formations—from softer morning tones to deeper reds and oranges—giving the landscape a constantly changing feel.
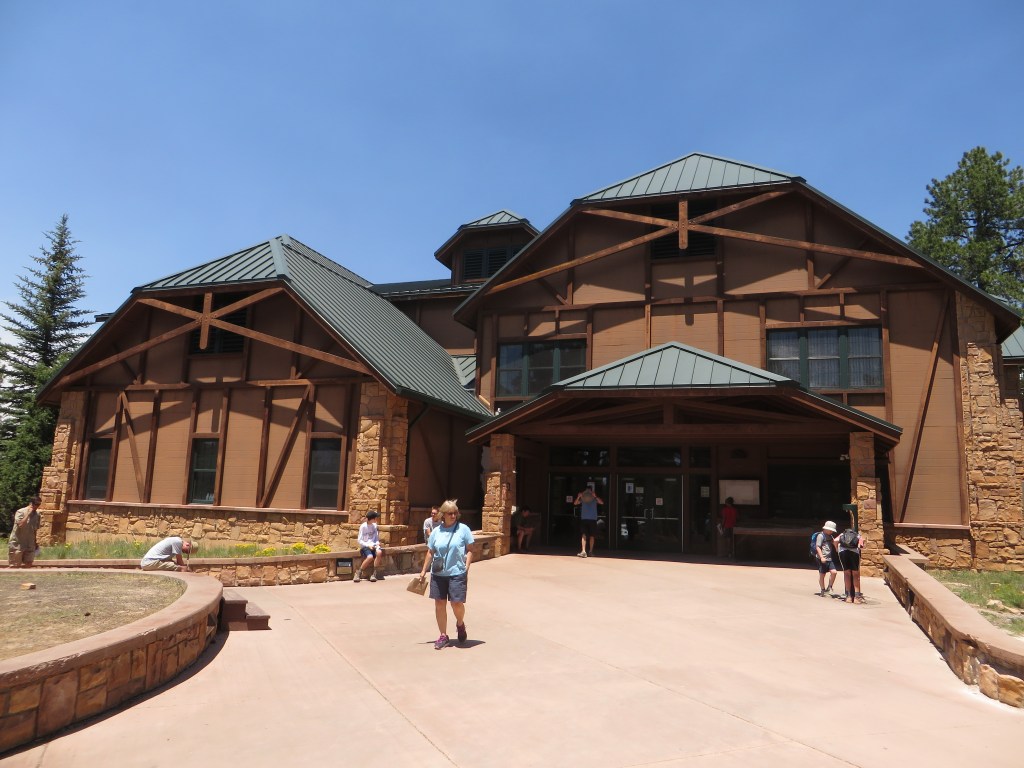
Bruce Canyon Visitor Center
After passing through the park entrance, we’ll make our way toward the Bryce Canyon Visitor Center, located about 1 mile inside the park along the main road. This is a good place to pause briefly—orient yourself with the layout of the park, check current trail conditions, and take advantage of restrooms or water before heading out. If you’re interested, the exhibits provide a helpful overview of how Bryce’s hoodoos are formed, adding context to what you’ll see throughout the day. Even a short stop here helps ground the experience before stepping out along the rim.
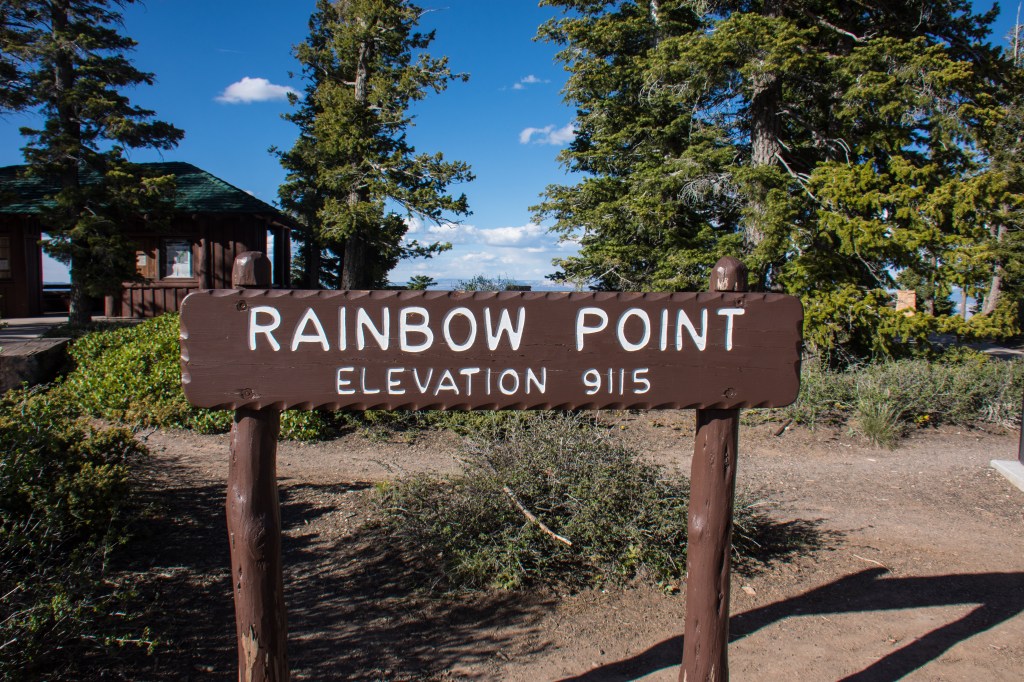
Rainbow Point & Yovimpa Point
We will begin at the far southern end of the park, about 18 miles from the Bryce Canyon Visitor Center, where the main road ends at Rainbow Point. Parking is easy with a large lot just steps from the viewpoints, and from here a short, clearly marked path leads onto a paved rim trail with a gentle incline toward Rainbow Point before continuing a bit farther to Yovimpa Point, where the surface becomes slightly more natural but remains wide and manageable; at this higher elevation, the air feels cooler and the views open dramatically, offering a broad perspective not only across Bryce Canyon’s amphitheater but also toward the surrounding plateaus and distant horizons, making this less about individual hoodoos and more about understanding the full scale of the landscape; this is an out-and-back walk of about 0.5–1.0 miles round trip with roughly 100 feet of elevation gain, returning us to the same starting point, and you should allow about 30–45 minutes to take it in at a relaxed pace; when you are ready, we will return to the car and begin driving back north through the park, where the views gradually shift from wide, elevated perspective to more defined formations.
Agua Canyon Viewpoint
As we begin driving north from Rainbow Point, the first notable stop is Agua Canyon Viewpoint, located about 3 miles ahead along the main road; it is clearly marked and requires a right turn into the parking area, with the viewpoint just steps from the lot for a quick and easy stop; this is an out-and-back walk of about 0.1 miles round trip with minimal elevation gain, returning you to the same starting point, and you should allow about 5–10 minutes.
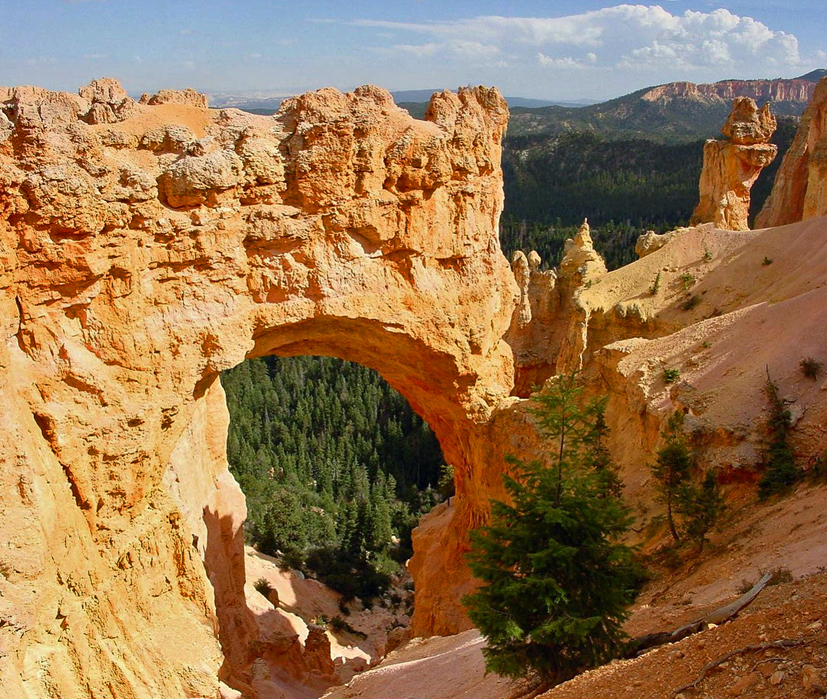
Natural Bridge
Continuing north for about 1–2 miles, watch for Natural Bridge Viewpoint, one of the more prominent pull-offs along this stretch; it will be clearly marked, and you’ll make a left turn into the parking area, where a short walk leads to the viewpoint; this is an out-and-back walk of about 0.1–0.2 miles round trip with minimal elevation gain, returning you to the same starting point, and you should allow about 10–15 minutes.
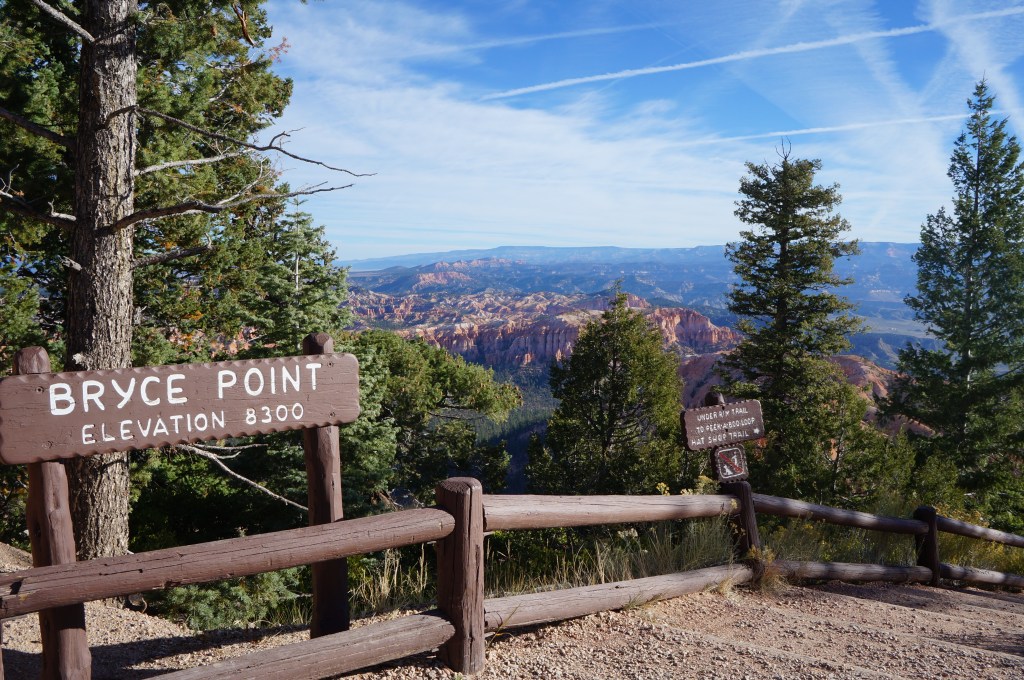
Bryce Point (Optional Stop Before the Main Area)
Farther along, you’ll come to Bryce Point, accessed via a clearly marked right turn onto a short spur road that leads to a larger parking area; this is one of the more prominent viewpoints before reaching the main amphitheater stops and is worth considering if time allows, offering a slightly different angle into the canyon than Sunrise or Sunset Point; from the parking area, it’s a short walk to the overlook; this is an out-and-back walk of about 0.2–0.3 miles round trip with minimal elevation gain, returning you to the same starting point, and you should allow about 10–15 minutes.
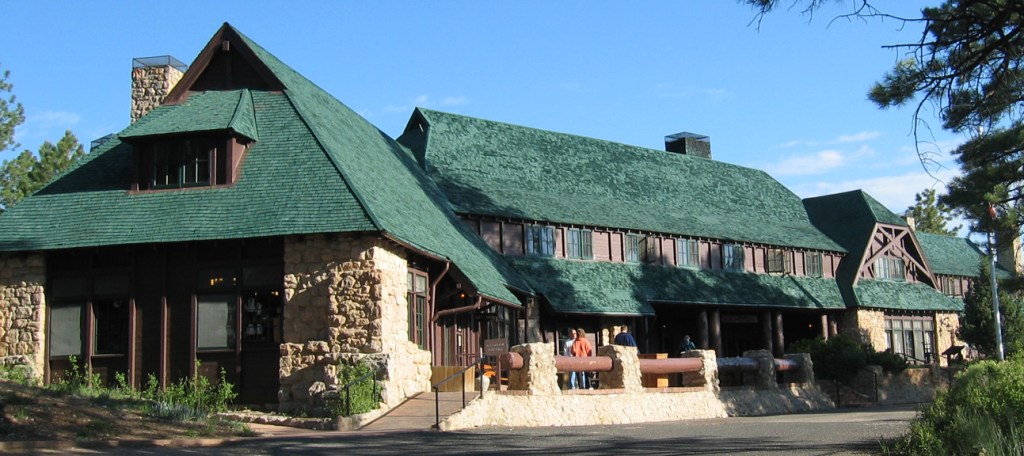
Bryce Canyon Lodge
Continuing north about 3–4 miles from Bryce Point, follow signs for Bryce Canyon Lodge, then take the clearly marked left turn off the main park road into the lodge area. Follow this road to the main parking areas, which are shared with the lodge, Sunrise Point, and nearby trailheads; park here and orient yourself—the lodge sits just beyond the parking area among the trees, while the rim is a short walk away; this is a natural place to pause and reset, whether for a relaxed lunch, a break after the drive, or simply to take in the setting before beginning your main hike; from this central location, you can access Sunrise Point to the northeast (a short walk or very quick drive) and Sunset Point to the south along the rim, making it an ideal staging area for the next phase of the day; allow about 45–60 minutes if stopping for a meal or a shorter break before continuing on foot.
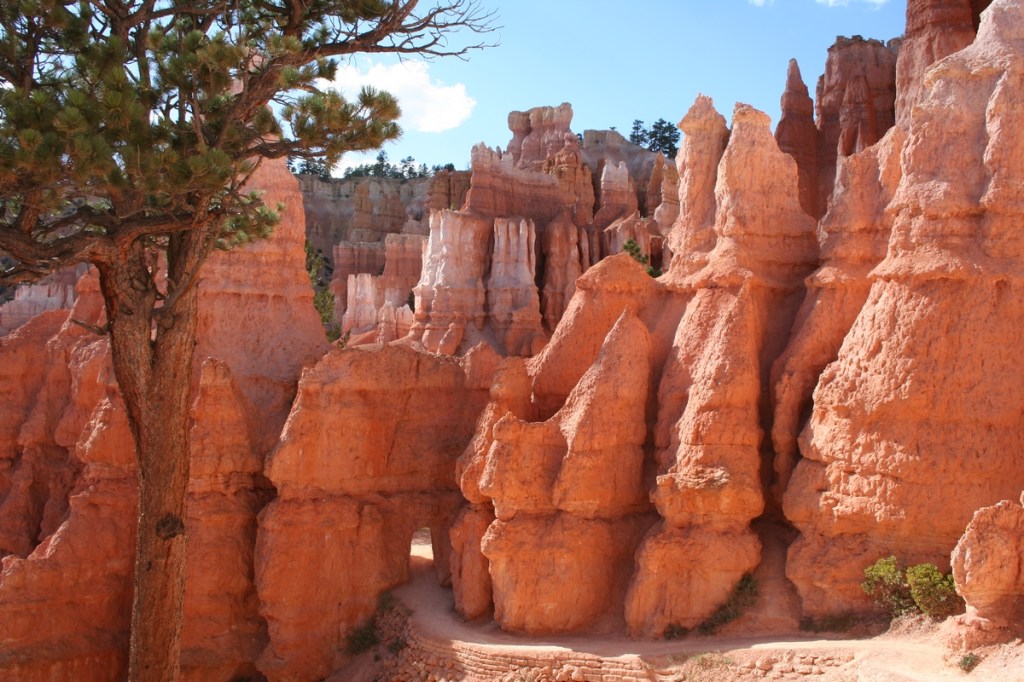
Queen’s Garden → Navajo Loop
This will be our longest hike of the day. From the Bryce Canyon Lodge parking area, walk along the Rim Trail toward Sunrise Point, located about 0.5 miles to the northeast; this is an easy, mostly flat path along the canyon edge and a natural way to begin the transition from lodge to trailhead; upon reaching Sunrise Point, begin the descent on the clearly marked Queen’s Garden Trail, which provides the most gradual and approachable entry into the amphitheater; continue down to the canyon floor and follow signs to connect with the Navajo Loop Trail, then take the Wall Street route back to the rim—the most dramatic option, with tight switchbacks through narrow rock walls; if Wall Street is closed, continue on the alternate Navajo route (Two Bridges), which climbs more gradually but returns to the same destination; both routes bring you up to Sunset Point, passing formations such as Thor’s Hammer along the way; from Sunset Point, follow the Rim Trail north for about 0.5 miles to return to Sunrise Point and the lodge area; this is a loop hike of about 2.7–3.0 miles round trip with roughly 600–650 feet of elevation gain, returning you to the starting area, and you should allow about 1.5–2.5 hours. AllTrails Link.
Check In Before Sunset
After completing the hike and returning to the rim, this is a natural point in the day to check into your lodging—whether you’re staying inside the park at Bryce Canyon Lodge or just outside the entrance in Bryce Canyon City; if you’re heading out of the park, the drive is short and straightforward, typically about 10 minutes; either way, this break gives you time to relax and recharge after the main hike—settle in, freshen up, and take a moment before the evening; this is a short out-and-back transition if you leave the park, returning you to the rim for sunset, which is just a quick drive away when you’re ready to head back.
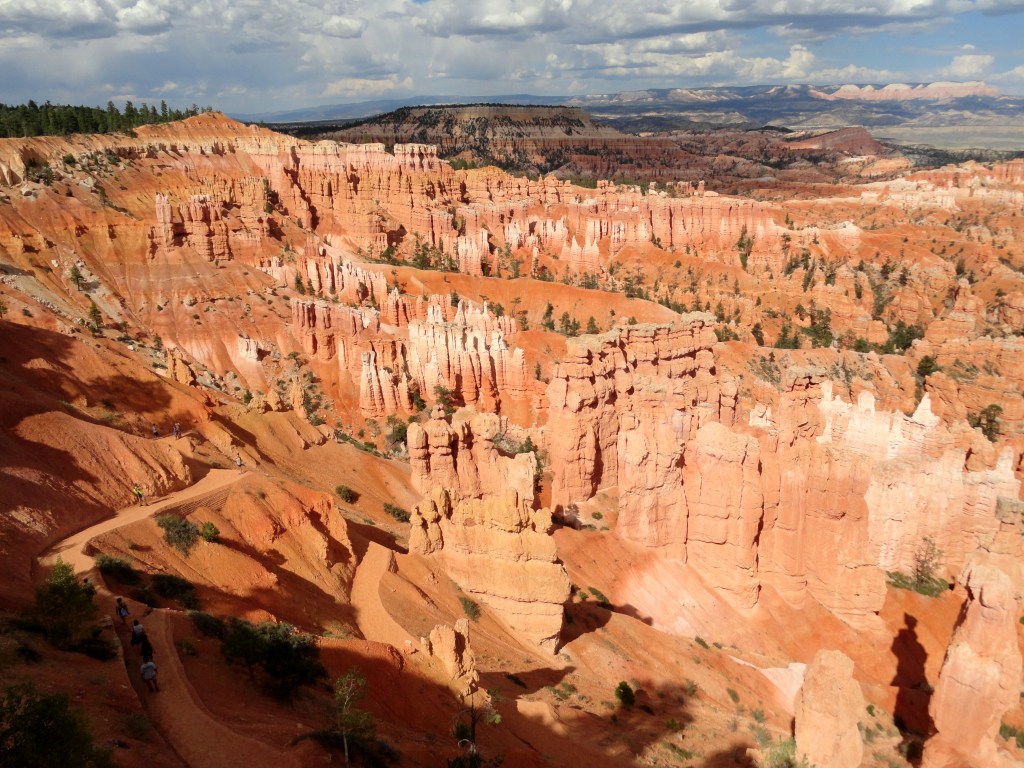
Sunset at Sunset Point / Bryce Amphitheater
As the day winds down, make your way back to Sunset Point, whether from nearby Bryce Canyon Lodge or a short drive in from Bryce Canyon City; parking is clearly marked, though it can fill as sunset approaches, so allow a few extra minutes if needed; from the lot, it’s a short and easy walk to the rim, where the amphitheater opens up in front of you; this is one of the most accessible viewpoints in the park, and an ideal place to pause as the light begins to shift; as the sun lowers, the hoodoos gradually change color, moving from soft oranges to deeper reds and shadows, creating a layered effect across the formations; there is no set path to follow here—simply find a place along the rim and take it in; this is an out-and-back walk of about 0.1–0.2 miles round trip with minimal elevation gain, returning you to the same starting point, and you should allow about 30–45 minutes. If you plan to stay through sunset or into dusk, it’s helpful to have a small flashlight or phone light for the short walk back.
Dinner Options
After sunset, a relaxed dinner is a fitting way to close out the day, with several convenient options depending on where you are staying; if you prefer to remain inside the park, the Bryce Canyon Lodge Dining Room offers a slightly more polished but still approachable setting with classic American dishes in a historic lodge atmosphere; just outside the park in Bryce Canyon City, Ruby’s Inn Cowboy’s Buffet & Steak Room is the most convenient option, especially if you’re nearby, with hearty Western-style food and an easy, no-fuss experience; next door, Ebenezer’s Barn & Grill adds a bit more energy to the evening with a casual meal paired with a live cowboy music show; for something a little quieter and more local, Bryce Canyon Pines Restaurant, located just outside the main area, is a favorite for comfort food—known especially for its pies, burgers, and fried chicken; any of these provide an easy and satisfying way to unwind after a full day, without requiring much additional travel.
Thanks for exploring with me!
I hope you enjoyed the drive from Zion to Bryce Canyon and the Bryce Canyon Experience.
If you enjoyed the route, found a hidden gem, or have ideas for improving the experience, I’d love to hear from you! Your insights help me improve future walks and inspire fellow travelers. Please rate this walk using the stars below — and feel free to leave a comment. Thank you! — and happy exploring!


Click here for more JCV Walks
Your journey doesn’t have to end here. Choose another walk and let’s keep exploring together—one step at a time.
JCV Walks in Zion National Park
Experience the canyon from within along riverside trails and scenic paths beneath towering sandstone walls. A balanced mix of easy walks and striking views, with an option to explore by bike or shuttle.
Photo Credits
- Bryce Canyon Panorama by I, Jonathan Zander, CC BY-SA 3.0
- Zion Mt. Carmel Tunnel by Alex Proimos, CC BY 2.0
- Springdale Utah by Raymond Shobe By Raymond Shobe, CC BY 2.0
- Zion Canyon Overlook Trail by Fabio Achilli, CC BY 2.0
- Great Arch of Zion by Daniel Mayer CC BY-SA 3.0
- Checkerboard Mesa by David Broad, CC BY 3.0
- Zion National Park East Entrance by An Errant Knight, CC BY-SA 4.0
- Mt. Carmel Junction by P199, CC BY-SA 3.0
- US‑89 North by Bill Golladay, CC BY-SA 4.0
- Red Canyon Arch by Andrew Heneen, CC BY 4.0
- Ruby’s Bryce Canyon City by Fabio Achilli, CC BY 2.0
- Bryce Canyon National Park by I, Luca Galuzzi, CC BY-SA 2.5
- Bryce Canyon Visitor Center by Ken Lund, CC BY-SA 2.0
- Rainbow Point Bryce Canyon by m01229, CC BY-SA 2.0
- Natural Bridge Bryce by Frans-Banja Mulder, CC BY 3.0
- Agua Canyon Viewpoint by Ken Lund, CC BY-SA 2.0
- Bryce Point by Pierre André, CC BY-SA 4.0
- Bryce Canyon Lodge by Public Domain
- Queen’s Garden Trail Bryce by Sara Simoni, CC BY-SA 3.0
- Park Ranger Talk by Albert Herring, Public Domain
- Sunset at Sunset Point Navajo Loop by Fabio Achilli, CC BY 2.0
